Firstly I will start with 3 qualifying questions to understand if you should read this post or not:
- Do you work in a business where people make a contract with you or pay you after a process/discussion takes place rather than a simple online transaction?
- Do you run Google ads and see the conversion data but lack visibility on which of those conversions turned into a paying customer?
- Would you like to tie your offline sales to the conversions you see in your Google ads account so that you can see the return on investment of your spend at a campaign, ad group and keyword level?
If your answer to those questions are all “yes” then please read on as there is a simple solution:
In the dynamic landscape of online advertising, businesses often grapple with the challenge of connecting their digital efforts to real-world, offline conversions. Fortunately, Google Ads provides a solution through the powerful tool of offline conversion imports. In this post, we’ll explore what offline conversion imports are, delve into the myriad benefits they offer, and walk you through the step-by-step process of setting them up for your business.
Understanding Offline Conversion Imports
Offline conversion imports in Google Ads serve as a bridge between your online advertising endeavours and the tangible, offline actions that your customers take. Whether it’s in-store purchases, phone calls, or other offline interactions, this feature allows you to track and attribute these conversions back to the specific online ads that influenced them.
Benefits of Offline Conversion Imports
1. Holistic Campaign Performance Measurement: Gain a complete understanding of your campaign’s impact by connecting the dots between online ad interactions and offline conversions. This holistic approach provides a more accurate representation of your marketing success.
2. Optimized Bidding and Budgeting: With offline conversion data integrated into Google Ads, advertisers can make more informed decisions about bidding strategies and budget allocations. This leads to more efficient spending, focusing resources on campaigns and keywords that drive valuable offline conversions.
3. Enhanced Targeting: Advertisers can use offline conversion data to refine their audience targeting. By identifying the characteristics of users who are more likely to convert offline, advertisers can adjust their targeting parameters to reach a more qualified audience.
4. Data-Driven Decision Making: Offline conversion imports provide valuable data for making data-driven decisions. Advertisers can analyse trends, identify patterns, and draw insights from the combined online and offline conversion data. This empowers them to make informed adjustments to their marketing strategies.
5. Demonstrated Return on Investment (ROI): Linking offline conversions to online ad interactions allows advertisers to calculate the true return on investment. This clarity on the impact of advertising spend on actual revenue or leads generated offline helps in demonstrating the value of the advertising efforts.
How to Set Up Offline Conversion Imports
Google Ads offers 4 options to see how your Google Ads campaigns drive offline conversion imports but, in this blog post, we will cover the widely used option “Directly through Google Ads Conversion Import” which allows you to import conversions that you track in any lead management system into Google Ads.
The other 3 options allow to work with CRM systems such as Salesforce and using tools like Zapier and Hubspot.
There are 2 main methods for direct Google Ads Offline Conversions Import.
1. Using Google Click Identifier (GCLID)
2. Enhanced Conversion for Leads
Using Google Click Identifier (GCLID)
GCLID is a unique identifier assigned by Google Ads to each click on an advertisement. When a user clicks on a Google Ads ad, a GCLID is generated and associated with that particular click. You’ll save that ID in the lead management system along with the lead information. Later, when that person does a conversion, for example, by making a purchase, you import this information back to Google Ads with GCLID allowing Google Ads to connect the dots between the ad click and the conversion.
Steps to set up offline conversion imports using GCLID
- Open Conversions under Tools and Settings in your Google Ads Account.
- Click +New Conversion Action and then click Import.
- Select Manual import using API or uploads. If you like to integrate your CRM then select Other data sources or CRMs.
- Click Continue. On the next screen, enter Conversion Name along with other fields for the conversion.
- Click Create and Continue and then click Done.
- Update the lead submission form to the GCLID gets passed to your lead management system. You may need to speak with your developer to set this up. This page https://support.google.com/google-ads/answer/7012522 has a suggested script for this.
Enhanced Conversions for Leads
When a customer submits a lead form, your website securely sends Google hashed lead details, like a hashed email address. You store this information in your CRM. Later, when a lead becomes a customer, you upload the hashed data back to Google Ads. Google matches it to the ad and the keyword that brought in the lead, helping you understand which ads/keywords are effective in turning leads into customers.
With this method, you don’t need to modify your lead form or lead management system to pass and receive GCLID. Instead, it uses information like email addresses and phone numbers that were already captured in the lead form to measure offline conversions.
You can set up enhanced conversions for leads using Google Tag Manager, Google Tag or Google Ads API. In this post, we will cover the steps for set up through Google Tag Manager. But if you want to learn about the steps through other methods then see this page https://support.google.com/google-ads/answer/11021502 for set up through Google Tag and https://developers.google.com/google-ads/api/docs/conversions/enhanced-conversions/leads-setup for set up through Google Ads API.
Steps to set up Enhanced Conversions for Leads through Google Tag Manager
1. Set up enhanced conversions for leads in Google
- Open Conversions under Tools and Settings in your Google Ads Account.
- Click +New Conversion Action and then click Import.
- Select Manual import using API or uploads. If you like to integrate your CRM then select Other data sources or CRMs.
- Check the box “Turn on enhanced conversions for leads”. Under “Choose a method for setting up and managing user-provided data”, select Google Tag Manager.
- Click Continue. On the next screen, enter Conversion Name along with other fields for the conversion.
- Click Create and Continue and then click Done.

2. Set up enhanced conversions for leads in Google Tag Manager
Once the conversion action is created in Google Ads, the next step is to do the following set up in Google Tag Manager.
- Set up a conversion linker tag.
- Specify a data source for leads conversions.
A pre-requisite for this is to ensure that your website leads are being tracked through a set up in Google Tag Manager where there are triggers for each of your lead types – such as contact us form completion, Book a demo form completion, etc etc.
Assuming you have triggers set in GTM for your basic lead types let’s move onto the set up.
Set up a conversion linker tag
- Open the container in Google Tag Manager.
- Click Tags and then click New.
- Click Tag Configuration and select Conversion Linker.
- Select a trigger. In general, you should use a trigger that fires on all page views, or on specific page views where site visitors will land after an ad is clicked.
- Save and publish your tag configuration.

Specify a data source for lead conversions using automatic collection
- In Google Tag Manager workspace, click on Tags from left side pane.
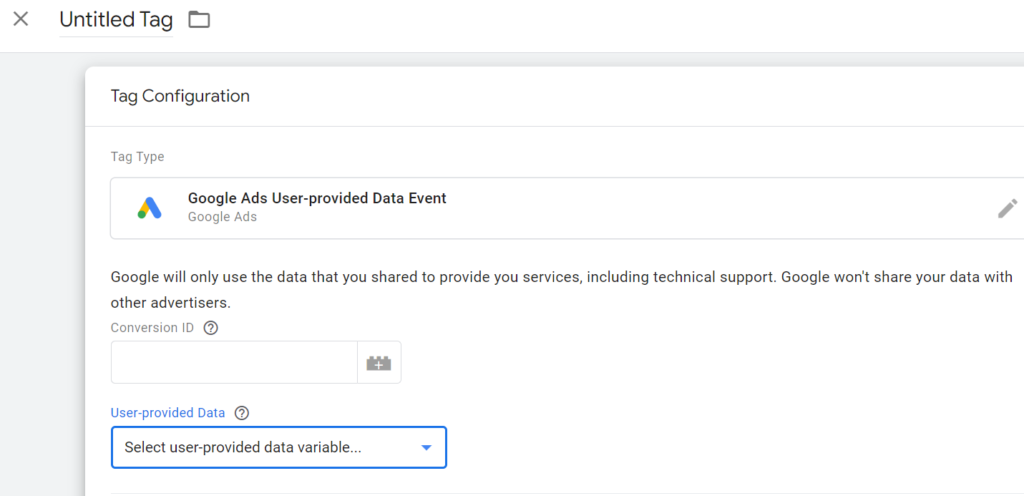
- Click on “Tag Configuration”. Select Google Ads and then select Google Ads User-provided Data Event.
- Enter Google Ads conversion tracking ID under Conversion ID. Select New variable under “User-provided Data”.

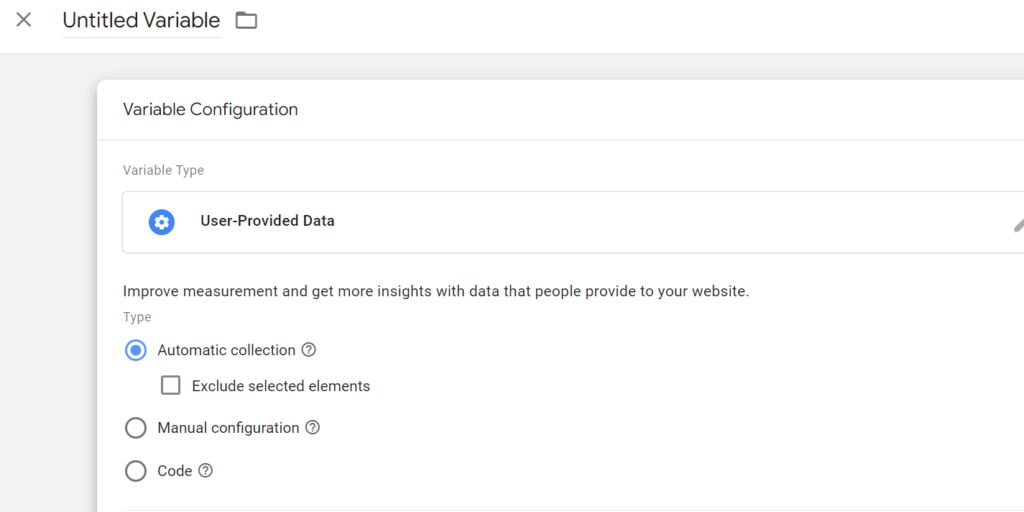
4. In the variable window, select Automatic Collection as the type.

5. Name the variable and click Save.
6. Click on “Triggering” and then select a trigger that happens after the lead gets submitted for example, lead form submission.
7. Name the trigger and click Save.
8. Name and save your new tag. It should look like below screen.

9. Publish your tag. Make sure that the tag behaves as intended in the preview mode.
Import Offline Conversions into Google Ads
You can import your data into Google Ads by uploading or linking to a file through the Google Ads interface, by using a CRM integration or by transmitting the data through the Google Ads API. This article explains how to import conversions by uploading a file.
- Open Conversions under Tools and Settings in your Google Ads Account.
- Click Uploads and then click + button.
- Under Select source, click Upload a file. You can click on View templates to view and download correct template in Excel, CSV or Google Sheets format.
- Click Apply. A progress bar at the bottom of the page will notify you when the conversions in your file have finished importing. Click Details in the progress bar to view all the conversions that were imported.
It takes a few hours for the imported conversion statistics to become visible in your Google Ads account, showing up in the ‘Conversions’ columns. To verify whether your conversion imports are working, refer to the ‘All conv. (by conv. time)’ column. Unlike other conversion columns, this one reports total conversions based on the conversion date recorded in your upload file.

